
목차
들어가기 전에
스프링부트 프로젝트를 개발하다 보면 운영/개발 등의 환경에 따라 코드에 들어가야 하는 값이 달라지는 경우가 있다. 단순히 현재 서버가 어떤 서버인지를 확인해줄 문자열이 될 수도 있고, 다른 API를 통해 서비스를 제공하는 프로젝트라면 해당 API를 제공하는 서버 호스트가 될 수도 있다.
이렇게 구동 환경에 따라 달라지는 값들은 yml파일 또는 properties 파일에서 프로파일을 나눠서 관리하고 실제 코드에서는 @Value로 값을 바인딩해서 사용하게 된다.
그런데 @Value로는 final 변수에 값을 바인딩하려면 롬복으로 생성자를 선언하는 방식을 사용할 수 없기 때문에 변경사항이 발생했을 때 굉장히 귀찮아진다. 이 경우 생성자 바인딩이라는 방식을 통해 프로퍼티 설정 값을 수월하게 final 변수로 사용할 수 있다.
@Value로 프로퍼티 값 바인딩
사실 코틀린에서는 자바의 final에 대응하는 val 변수에 @Value로 값을 바인딩하는게 어렵지 않다. 코틀린의 문법 상 프로퍼티를 선언할 때 동시에 생성자가 만들어지기 때문이다.
@Service
class TokenProvider(
    @Value("\${secret-key}")
    private val secretKey: String,
    @Value("\${expiration-hours}")
    private val expirationHours: Long,
    @Value("\${issuer}")
    private val issuer: String
) {
    ...
}
하지만 자바에서 final 변수에 @Value로 값을 바인딩하려면 롬복 없이 보일러 플레이트 코드로 생성자를 만들어야 한다. @RequiredArgsConstructor는 final로 선언되어있는 필드에 스프링 빈을 주입하려고 하기 때문이다.


결국 보일러 플레이트 코드로 생성자를 만들어서 생성자의 파라미터에 @Value를 붙여줘야 final 변수에 프로퍼티 값을 바인딩할 수 있다.
@Service
public class TokenProvider {
    private final String secretKey;
    private final long expirationHours;
    private final String issuer;

    public TokenProvider(
            @Value("${secret-key}") String secretKey,
            @Value("${expiration-hours}") long expirationHours,
            @Value("${issuer}") String issuer
    ) {
        this.secretKey = secretKey;
        this.expirationHours = expirationHours;
        this.issuer = issuer;
    }

    ...
}@Value의 단점
자바에서 @Value를 사용할 때 발생하는 단점은 다음과 같이 정리할 수 있다.
- 일반 바인딩 방식이나 롬복을 사용한 생성자 바인딩 방식은
final을 사용할 수 없기 때문에 값을 변경해버릴 수 있다. - 생성자를 사용해서 바인딩하면
final을 사용할 수 있으나 보일러 플레이트 코드를 사용해야 해서 해당 클래스에서 주입받는 스프링 빈 등이 추가되거나 제거되면 수정하기가 매우 귀찮다.
이 문제에서 비교적 자유로운 코틀린이라고 하더라도 다음의 단점은 자바와 공유하게 된다.
- 여러 클래스에서 동일한 프로퍼티 값을 바인딩해서 사용하게 된다면 중복 코드가 발생하고,
@Value로 프로퍼티 값의 키를 매번 작성해가며 바인딩하다보니 코드가 지저분해질 수 있다.
생성자 바인딩을 사용해보자
Constructor Binding. 단어 그대로 생성자 바인딩이다. 이 방법을 사용하면 프로퍼티 값을 통째로 클래스의 필드 또는 프로퍼티에 바인딩할 수 있다. 이로 인해 여러 클래스에서 동일한 프로퍼티 값을 사용하는 경우에도 또한 해당 이렇게 프로퍼티 값이 통째로 바인딩된 객체를 주입받아서 사용해서 중복 코드를 줄일 수 있다.
아래와 같은 프로퍼티를 클래스의 필드에 바인딩하는 경우를 생각해보자.
file-path:
  log-path: /home/centos/demo/logs
  download-path: /home/centos/demo/download

api-config:
  host: https://www.demo.com
  authorization: eyJhbGciOiJIUzUxMiJ9.eyJpc3MiOiJjb2xhYmVhcjc1NCIsImlhdCI6MTcwMjYyNzE5MSwiZXhwIjoxNzAyNzEzNTkxfQ.-VRK5VRvaX4vvWl0q-LnCiThZNqMGThPX5RZ5stDbFj0pnnaCmtDzeVHMi0ttSR1ZVBpbAMtPX-0wWzbKdTePg
우선 값을 바인딩 받을 클래스를 작성한다.
@Getter
@ConfigurationProperties("file-path")
@RequiredArgsConstructor
@ConstructorBinding		// 스프링부트 3.0 이상에서는 제외
public class FilePathProperties {
    private final String logPath;
    private final String downloadPath;
}
@Getter
@RequiredArgsConstructor
@ConfigurationProperties("api-config")
@ConstructorBinding // 스프링부트 3.0 이상에서는 제외
public class ApiConfigProperties {
private final String host;
private final String authorization;
}
@ConfigurationProperties의 값에는 yml 또는 properties 파일에서 바인딩하고자 하는 값의 키에서 상위 레벨의 키를 모두 작성해주면 된다. (aaa.bbb.ccc의 값을 바인딩하고 싶으면 @ConfigurationProperties("aaa.bbb")와 같은 식으로)
클래스의 필드에는 바인딩하고자 하는 값의 최하위 키를 필드명과 매칭해서 작성해주면 된다. 이 때 하이픈으로 구분된 단어들은 자동으로 카멜케이스로 치환된다.(위 사진에서 FilePathProperties와 같은 경우)
@ConstructorBinding 어노테이션은 스프링부트 3.0 미만에서만 붙여준다. 스프링부트 3.0 이상일 경우에는 컴파일 에러가 발생한다.
그리고 스프링부트 메인 클래스(일반적으로는 프로젝트명Application)에 아래와 같이 어노테이션을 추가해준다.
@EnableConfigurationProperties({FilePathProperties.class, ApiConfigProperties.class})	// 추가
@SpringBootApplication
public class PropertiesDemoApplication {

    public static void main(String[] args) {
        SpringApplication.run(PropertiesDemoApplication.class, args);
    }

}@EnableConfigurationProperties의 값으로는 프로퍼티 값을 바인딩해줄 클래스의 타입 배열을 넣어주면 된다.
이렇게 생성자 바인딩을 통해 프로퍼티 값을 바인딩 받는 클래스는 일반 스프링 빈과 동일한 방식으로 주입받아서 사용할 수 있다.
이제 테스트 코드를 작성해서 제대로 바인딩이 되었는지 확인해보자.
@SpringBootTest
public class ConstructorBindingTest {
    private final FilePathProperties filePathProperties;
    private final ApiConfigProperties apiConfigProperties;

    @Autowired
    public ConstructorBindingTest(FilePathProperties filePathProperties, ApiConfigProperties apiConfigProperties) {
        this.filePathProperties = filePathProperties;
        this.apiConfigProperties = apiConfigProperties;
    }

    @Test
    void 생성자_바인딩_테스트() {
        // given
        String logPath = filePathProperties.getLogPath();
        String downloadPath = filePathProperties.getDownloadPath();
        String host = apiConfigProperties.getHost();
        String authorization = apiConfigProperties.getAuthorization();
        // when
        // then
        assertThat(logPath).isEqualTo("/home/centos/demo/logs");
        assertThat(downloadPath).isEqualTo("/home/centos/demo/download");
        assertThat(host).isEqualTo("https://www.demo.com");
        assertThat(authorization).isEqualTo("eyJhbGciOiJIUzUxMiJ9.eyJpc3MiOiJjb2xhYmVhcjc1NCIsImlhdCI6MTcwMjYyNzE5MSwiZXhwIjoxNzAyNzEzNTkxfQ.-VRK5VRvaX4vvWl0q-LnCiThZNqMGThPX5RZ5stDbFj0pnnaCmtDzeVHMi0ttSR1ZVBpbAMtPX-0wWzbKdTePg");
    }
}
테스트가 잘 통과하는 것을 볼 수 있다.
번외1 - 클래스가 많아지면 어떡하지?
이 방법은 프로퍼티 값을 바인딩 받을 클래스가 늘어날수록 스프링부트 메인 클래스의 @EnableConfigurationProperties에 클래스를 계속 추가해야 한다는 문제가 있다. 이렇게 되면 번거로울 뿐만 아니라 코드가 굉장히 지저분해질 수 있다.
이 때 @ConfigurationPropertiesScan을 사용할 수 있다. 이 어노테이션을 사용하면 @ConfigurationProperties가 붙은 클래스를 자동으로 탐색해서 스프링 빈으로 등록해준다.
스프링부트 메인 클래스의 내용만 아래처럼 수정해준다.
//@EnableConfigurationProperties({FilePathProperties.class, ApiConfigProperties.class})	 얘를 지우고
@ConfigurationPropertiesScan	// 이걸 추가해준다
@SpringBootApplication
public class PropertiesDemoApplication {

    public static void main(String[] args) {
        SpringApplication.run(PropertiesDemoApplication.class, args);
    }

}
이 때, @ConfigurationPropertiesScan의 값으로 탐색하고자 하는 패키지를 지정할 수 있다. 이렇게 하면 해당 패키지 내부의 클래스만 탐색한다.(기본값 : 프로젝트 전체)
인텔리제이에서 어노테이션 왼쪽의 아이콘을 클릭해서 탐색된 클래스들을 확인할 수도 있다.

테스트 코드를 실행해보면 동일하게 테스트를 잘 통과하는 걸 볼 수 있다.

번외2 - 코틀린이라면?
코틀린도 자바 동일한 방법으로 생성자 바인딩을 통한 프로퍼티 값을 가져올 수 있다.
@ConfigurationProperties("file-path")
class FilePathProperties(
    val logPath: String,
    val downloadPath: String
)
@ConfigurationProperties("api-config")
class ApiConfigProperties(
val host: String,
val authorization: String
)문법의 차이로 인해 롬복이 사라졌을 뿐 동일한 구조라는 것을 알 수 있다.
@ConfigurationPropertiesScan
@SpringBootApplication
class PropertiesDemoKtApplication

fun main(args: Array<String>) {
    runApplication<PropertiesDemoKtApplication>(*args)
}
메인 클래스에도 동일하게 @EnableConfigurationProperties 또는 @ConfigurationPropertiesScan을 붙여준다.
@EnableConfigurationProperties(ApiConfigProperties::class, FilePathProperties::class)
@SpringBootApplication
class PropertiesDemoKtApplication

fun main(args: Array<String>) {
    runApplication<PropertiesDemoKtApplication>(*args)
}
또는
@ConfigurationPropertiesScan
@SpringBootApplication
class PropertiesDemoKtApplication
fun main(args: Array<String>) {
runApplication<PropertiesDemoKtApplication>(*args)
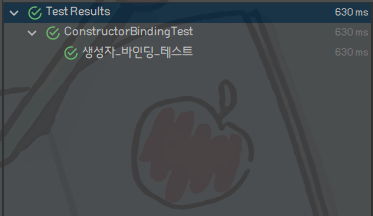
}테스트 코드를 작성해서 실행해보면 정상적으로 바인딩 된 것을 볼 수 있다.
@SpringBootTest
class ConstructorBindingTest @Autowired constructor(
    val apiConfigProperties: ApiConfigProperties,
    val filePathProperties: FilePathProperties
) {
    @Test
    fun `생성자 바인딩 테스트`() {
        // given
        val logPath = filePathProperties.logPath
        val downloadPath = filePathProperties.downloadPath
        val host = apiConfigProperties.host
        val authorization = apiConfigProperties.authorization
        // when
        // then
        assertThat(logPath).isEqualTo("/home/centos/demo/logs")
        assertThat(downloadPath).isEqualTo("/home/centos/demo/download")
        assertThat(host).isEqualTo("https://www.demo.com")
        assertThat(authorization).isEqualTo("eyJhbGciOiJIUzUxMiJ9.eyJpc3MiOiJjb2xhYmVhcjc1NCIsImlhdCI6MTcwMjYyNzE5MSwiZXhwIjoxNzAyNzEzNTkxfQ.-VRK5VRvaX4vvWl0q-LnCiThZNqMGThPX5RZ5stDbFj0pnnaCmtDzeVHMi0ttSR1ZVBpbAMtPX-0wWzbKdTePg")
    }
}
여담
자바에서 @Value로 final 변수에 프로퍼티 값을 바인딩하려면 보일러 플레이트 코드를 사용해야 해서 수정이 필요할 때 번거로워지는 문제가 있는데 이 방법은 롬복을 사용하면서도 손쉽게 final 변수에 프로퍼티 값을 바인딩할 수 있다는 장점이 있다고 생각한다.
코틀린은 그냥 기본 생성자의 프로퍼티에 @Value를 붙여주기만 해도 val 변수에 스프링부트 프로퍼티 값을 바인딩할 수 있지만 생성자 바인딩을 사용해서 중복되는 @Value를 제거하고 코드를 좀 더 깔끔하게 작성할 수 있다고 생각한다.
참조 링크
[SpringBoot] final 변수를 갖는 클래스에 프로퍼티(Properties) 설정 값 불러오기, 생성자 바인딩(Construct
Spring 프레임워크로 개발을 하다 보면 프로퍼티(Properties)에 저장된 특정한 설정 값들을 불러와야 하는 경우가 있다. 많은 글 들에서 프로퍼티(Properties)를 불러오는 내용들을 설명하고 있는데, 이
mangkyu.tistory.com
Spring Boot 3.0 Migration Guide
Spring Boot. Contribute to spring-projects/spring-boot development by creating an account on GitHub.
github.com
'Development > Spring & Spring Boot' 카테고리의 다른 글
| [Spring Boot] 스프링 인터셉터(Spring Interceptor)를 활용해서 API 로그를 DB에 기록해보자 (0) | 2024.03.01 |
|---|---|
| [Spring Boot] AOP를 이용해서 DB에 API 로그를 남겨보자 (2) | 2024.02.06 |
| [Spring Boot] H2 DB Embedded Mode 사용하기 (0) | 2023.10.04 |
| [Spring Boot] 스프링이 제공하는 다양한 어노테이션을 통한 유효성 검사와 응답 처리 (1) | 2023.08.28 |
| [Spring Security] 스프링 시큐리티를 적용하고 예외가 발생했을 때 403 Forbidden이 발생하는 원인과 처리 방안 (1) | 2023.08.05 |


댓글