
작성일 기준으로 Spring Initializr를 사용하여 스프링 부트 프로젝트를 생성할 때 3.0.0 이상인 버전과 2.7.X 버전 중에서 선택할 수 있다. 아직은 2.6.X나 2.7.X 버전을 사용하는 경우가 많으나, 언젠가는 3.0.0 이상인 버전을 사용하게 되는 경우가 더 많아질 수가 있다.
하지만 Java 버전을 국내에서 주로 사용하는 11이나 1.8로 설정하고 3.0.0 이상인 버전의 스프링 부트 프로젝트를 생성하면 최초 빌드 과정에서부터 에러가 발생하게 된다.

에러 로그의 핵심적인 부분만 추려내면 다음과 같다.
Incompatible because this component declares an API of a component compatible with Java 17 and the consumer needed a runtime of a component compatible with Java 11
쉽게 말해서 스프링 부트 3.0.0 부터는 Java 17 버전과 호환되는 컴포넌트 API를 선언했는데 Java 11 버전과 호환되는 컴포넌트를 지정해서 호환되지 않는다는 것이다. 다시 말해, 국내에서 주로 사용하는 Java 11이나 1.8 버전으로는 스프링 부트 3.0 이상인 버전을 사용할 수 없다! 실제로 Gradle 파일을 열어보면 다음과 같이 설정된 것을 볼 수 있다.
Gradle - Groovy
import org.jetbrains.kotlin.gradle.tasks.KotlinCompile

plugins {
    id 'org.springframework.boot' version '3.0.1'
    id 'io.spring.dependency-management' version '1.1.0'
    id 'org.jetbrains.kotlin.jvm' version '1.7.22'
    id 'org.jetbrains.kotlin.plugin.spring' version '1.7.22'
}

group = 'com.colabear754'
version = '0.0.1-SNAPSHOT'
sourceCompatibility = '17'

repositories {
    mavenCentral()
}

dependencies {
    ...
}

tasks.withType(KotlinCompile) {
    kotlinOptions {
        freeCompilerArgs = ['-Xjsr305=strict']
        jvmTarget = '17'
    }
}

tasks.named('test') {
    useJUnitPlatform()
}
Gradle - Kotlin
import org.jetbrains.kotlin.gradle.tasks.KotlinCompile

plugins {
    id("org.springframework.boot") version "3.0.1"
    id("io.spring.dependency-management") version "1.1.0"
    kotlin("jvm") version "1.7.22"
    kotlin("plugin.spring") version "1.7.22"
}

group = "com.colabear754"
version = "0.0.1-SNAPSHOT"
java.sourceCompatibility = JavaVersion.VERSION_17

repositories {
    mavenCentral()
}

dependencies {
    ...
}

tasks.withType<KotlinCompile> {
    kotlinOptions {
        freeCompilerArgs = listOf("-Xjsr305=strict")
        jvmTarget = "17"
    }
}

tasks.withType<Test> {
    useJUnitPlatform()
}SourceCompatibility와 jvmTarget이 17로 설정된 것을 볼 수 있다.
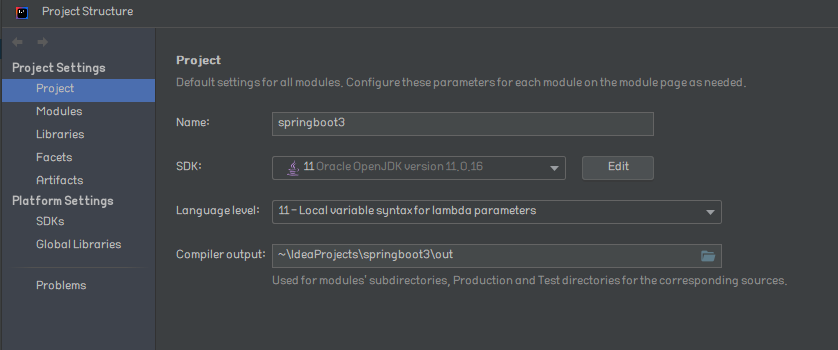
지금까지의 내용으로 알 수 있듯이 스프링 부트 3.0.X를 사용하려면 프로젝트 설정에서 SDK를 17로 설정해줘야 한다. 윈도우 단축키 Ctrl + Alt + Shift + S를 눌러 Project Structure 화면으로 진입하면 다음과 같은 모습이 나타난다.

여기서 17버전 이상의 JDK가 있다면 해당 JDK를 선택하면 되고 없는 경우에는 SDK의 콤보박스를 열어 Download JDK...에서 새로운 JDK를 설치한다. Download JDK...를 클릭하면 다음과 같은 창이 나타나는데 여기서 17 이상의 버전을 선택하고, JDK 종류를 선택한 후 원하는 경로에 다운로드하면 인텔리제이의 백그라운드에서 JDK 설치를 진행한다. 본 예제에서는 Amazon Corretto 17.0.5를 다운로드 받는다.
여기서 Language level은 굳이 건드리지 않아도 된다.


다운로드를 누르면 설치가 진행되고, JDK 설치가 완료되었다면 설치한 17버전 이상의 JDK로 SDK를 변경한 후 확인을 누른 후 Gradle을 리로드하면 정상적으로 스프링부트 3.0.X 관련 라이브러리들이 다운로드 된다.


이제 관련 라이브러리들이 모두 다운로드 되었고, 최초 빌드도 성공했으므로 프로젝트를 실행해보면 아래와 같이 정상적으로 실행되는 것을 볼 수 있다.

'Development > Spring & Spring Boot' 카테고리의 다른 글
| [Spring Boot] 다중 Profile을 이용하여 환경에 따라 다른 설정 적용하기 (0) | 2023.01.30 |
|---|---|
| [Spring/Spring Boot] Service와 ServiceImpl 구조에 대하여 (2) | 2023.01.26 |
| [Spring Boot] Springdoc 라이브러리를 통한 Swagger 적용 (6) | 2023.01.15 |
| [Spring Boot] application.properties와 application.yml의 차이점 (0) | 2023.01.04 |
| [Spring Boot] Scheduler를 사용하여 정해진 시간마다 메소드 실행시키기 (3) | 2022.12.30 |


댓글