
목차
개요
프로젝트를 진행하다 보면 로컬 개발 환경, 테스트 서버, 운영 서버에 따라 DB나 서버 포트 등과 같이 환경에 따라 설정을 다르게 적용해야 할 때가 있다. 이 때, Spring Boot의 다중 Profile을 이용하면 번거롭게 매번 설정을 수정할 일 없이 손쉽게 환경에 맞는 설정을 적용할 수 있다. 이번 포스트에서는 이러한 다중 Profile을 사용하는 방법과 Profile을 활성화 시켜 실행하는 방법에 대해 다룬다.
스프링부트 설정
spring.profiles.group은 하위의 key가 value에 해당하는 프로파일들을 포함한다. 즉, 하나의 프로파일을 활성화 하는 것으로 여러 개의 프로파일을 활성화하고 싶을 때 사용할 수 있다. 아래 예제들의 경우엔 dev는 profile1만 포함하게 되고 test는 profile2와 common를, prod는 profile3와 common을 포함하게 된다. 이 때, key와 value는 정해진 값이 아니라 원하는 임의의 값을 입력하면 된다.
2, 3, 4번째 구간의 spring.config.active.on-profile은 value의 프로파일이 활성화 되었을 때 이하의 설정을 적용한다는 의미가 된다. 아래의 예제는 각 프로파일 별로 DB에 연결하기 위한 datasource와 서버 포트가 다른 경우이다. 1번째 구간에도 추가적인 설정이 있는 것을 볼 수 있는데, 이렇게 spring.config.active.on-profile이 설정되지 않은 구간에 작성된 설정들은 default 설정이 되어 모든 프로파일에 적용된다.
application.yml
yml 파일로 Spring Boot 설정을 했을 때는 다음과 같이 '---'를 사용하여 각 프로파일을 구분하는 것으로 다중 Profile을 설정할 수 있다.
spring:
  profiles:
    group:
      dev: profile1
      test: profile2,common
      prod: profile3,common
default:
  string: default property
---
spring:
  config:
    activate:
      on-profile: profile1
  datasource:
    driver-class-name: org.h2.Driver
    url: jdbc:h2:~/test
    username: dev
    password:
server:
  port: 7777
---
spring:
  config:
    activate:
      on-profile: profile2
  datasource:
    driver-class-name: com.mysql.cj.jdbc.Driver
    url: jdbc:mysql://localhost:3306/test
    username: test
    password: test1234!
server:
  port: 8888
---
spring:
  config:
    activate:
      on-profile: profile3
  datasource:
    driver-class-name: com.mysql.cj.jdbc.Driver
    url: jdbc:mysql://localhost:3306/prod
    username: prod
    password: prod1234!
server:
  port: 9999
---
spring:
  config:
    activate:
      on-profile: common
common:
  string: common property
application.properties
properties 파일로 Spring Boot 설정을 했을 때는 다음과 같은 방식으로 다중 Profile을 설정할 수 있다. Spring Boot 2.4 이전 버전에서 properties 파일로 Spring Boot 설정을 할 때는 프로파일 별로 properties 파일을 따로 만들어야 했으나, Spring Boot 2.4버전부터는 위와 같이 하나의 파일에 여러 프로파일을 설정하고 '#---'를 사용하여 각 프로파일을 구분할 수 있게 되었다.
spring.profiles.group.dev=profile1
spring.profiles.group.test=profile2,common
spring.profiles.group.prod=profile3,common
default.string=default property
#---
spring.config.activate.on-profile=profile1
spring.datasource.driver-class-name=org.h2.Driver
spring.datasource.url=jdbc:h2:~/test
spring.datasource.username=dev
spring.datasource.password=
server.port=7777
#---
spring.config.activate.on-profile=profile2
spring.datasource.driver-class-name=com.mysql.cj.jdbc.Driver
spring.datasource.url=jdbc:mysql://localhost:3306/test
spring.datasource.username=test
spring.datasource.password=test1234!
server.port=8888
#---
spring.config.activate.on-profile=profile3
spring.datasource.driver-class-name=com.mysql.cj.jdbc.Driver
spring.datasource.url=jdbc:mysql://localhost:3306/prod
spring.datasource.username=prod
spring.datasource.password=prod1234!
server.port=9999
#---
spring.config.activate.on-profile=common
common.string=common property
프로파일을 적용하여 프로젝트 실행
IntelliJ에서 실행 시
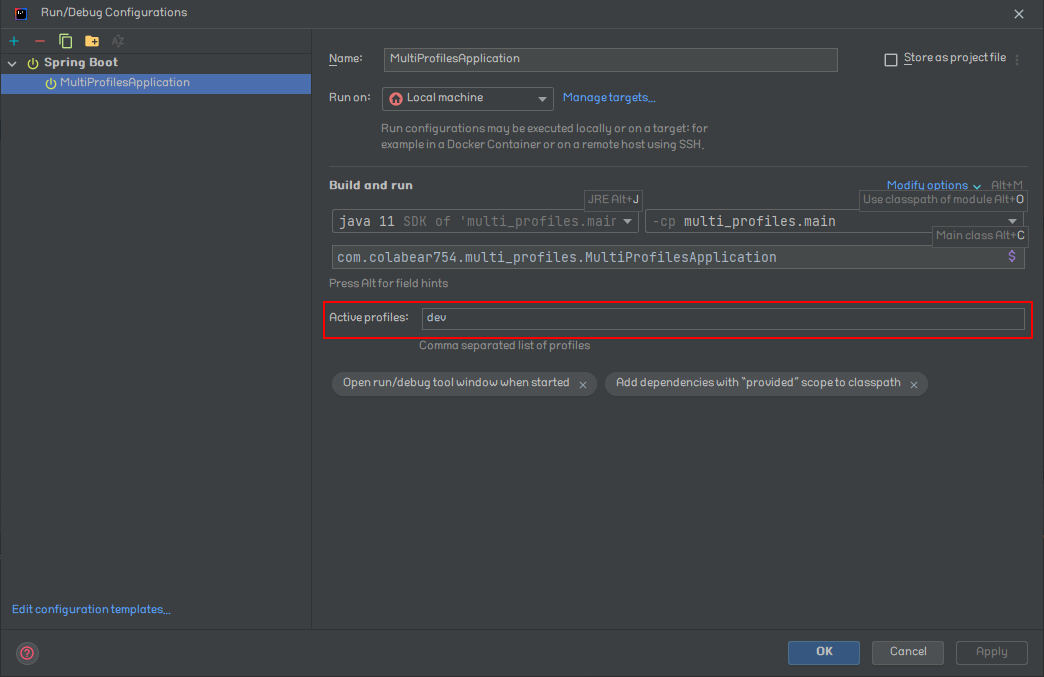
IntelliJ에서는 손쉽게 프로파일을 적용하여 Spring Boot 프로젝트를 실행할 수 있다. 프로덕션 코드의 경우에는 Run → Edit Configurations...로 진입하여 아래와 같이 Spring Boot Application 실행환경 설정에서 Active profiles에 활성화하려는 프로파일이나 프로파일 그룹의 이름을 입력한다.
테스트 코드의 경우에는 아래와 같이 테스트 클래스 위에 @ActiveProfiles("{프로파일 이름}") 어노테이션을 추가하면 된다.
@SpringBootTest
@ActiveProfiles("dev")
class MultiProfilesTest {
    @Test
    fun profileTest() {
        ...
    }
    ...
}
빌드된 파일 실행 시
CLI 환경에서 jar로 빌드된 Spring Boot 프로젝트를 실행할 때는 아래와 같이 파일명 뒤에 --spring.profiles.active={프로파일 이름}을 입력하여 해당 프로파일을 활성화할 수 있다.
java -jar multi_profiles.jar --spring.profiles.active=prodSpring Boot 프로젝트지만 간혹 외부 톰캣으로 실행해야하는 경우가 있다. 이 경우에는 Linux와 Window 환경에 따라 톰캣이 설치된 디렉토리 내의 bin 폴더 안에 다음과 같이 작성된 파일을 추가한다.
- Linux
vi 등의 편집기로 아래 내용을 작성하여 setenv.sh로 저장
JAVA_OPTS="$JAVA_OPTS -Dspring.profiles.active={프로파일 이름}"- Windows
메모장 등의 편집기로 아래 내용을 작성하여 setenv.bat로 저장
JAVA_OPTS=%JAVA_OPTS% -Dspring.profiles.active={프로파일 이름}프로파일이 제대로 설정되었는지 테스트
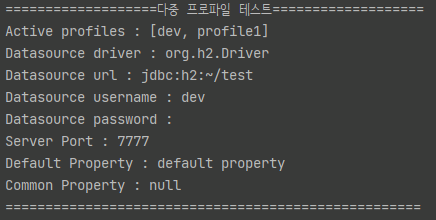
아래와 같이 간단한 ApplicationRunner 구현체를 작성하여 원하는 프로파일을 설정하고 실행하여 설정값을 콘솔에 출력해본다.
Kotlin
@Component
class AppRunner(private val environment: Environment) : ApplicationRunner {
    override fun run(args: ApplicationArguments?) {
        println("===================다중 프로파일 테스트===================")
        println("Active profiles : ${environment.activeProfiles.toList()}")
        println("Datasource driver : ${environment.getProperty("spring.datasource.driver-class-name")}")
        println("Datasource url : ${environment.getProperty("spring.datasource.url")}")
        println("Datasource username : ${environment.getProperty("spring.datasource.username")}")
        println("Datasource password : ${environment.getProperty("spring.datasource.password")}")
        println("Server Port : ${environment.getProperty("server.port")}")
        println("Default Property : ${environment.getProperty("default.string")}")
        println("Common Property : ${environment.getProperty("common.string")}")
        println("====================================================")
    }
}
Java
@Component
public class AppRunner implements ApplicationRunner {
    private final Environment environment;

    public AppRunner(Environment environment) {
        this.environment = environment;
    }

    @Override
    public void run(ApplicationArguments args) {
        System.out.println("===================다중 프로파일 테스트===================");
        System.out.println("Active profiles : "+ Arrays.toString(environment.getActiveProfiles()));
        System.out.println("Datasource driver : " + environment.getProperty("spring.datasource.driver-class-name"));
        System.out.println("Datasource url : " + environment.getProperty("spring.datasource.url"));
        System.out.println("Datasource username : " + environment.getProperty("spring.datasource.username"));
        System.out.println("Datasource password : " + environment.getProperty("spring.datasource.password"));
        System.out.println("Server Port : " + environment.getProperty("server.port"));
        System.out.println("Default Property : " + environment.getProperty("default.string"));
        System.out.println("Common Property : " + environment.getProperty("common.string"));
        System.out.println("====================================================");
    }
}- dev
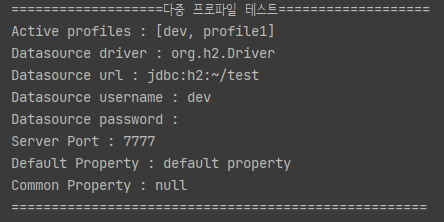
- test
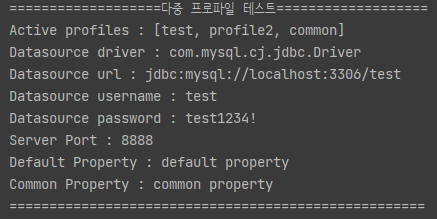
- prod
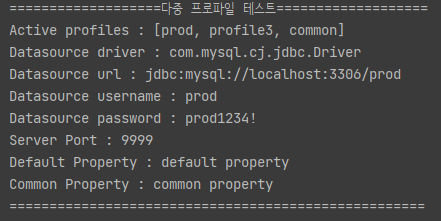
주의사항
공통 설정은 가급적이면 위쪽에 작성하기
이렇게 하나의 파일에 여러 개의 프로파일을 작성할 경우, 위에서 설정한 value를 아래에서도 설정하고 있다면 아래쪽의 value가 위쪽의 value를 덮어씌워버린다. 예를 들어, 위의 예제 설정에서 아래와 같이 common 프로파일에 spring.datasource.username을 설정하게 된다면 common을 포함하고 있는 test와 prod의 경우에는 각 프로파일에서 설정한 username을 common에서 설정한 username이 덮어버린다.
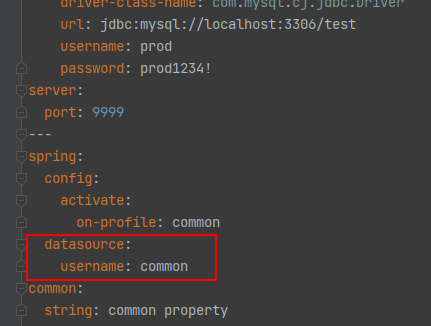
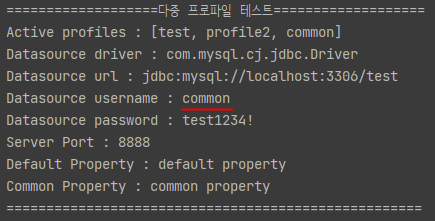
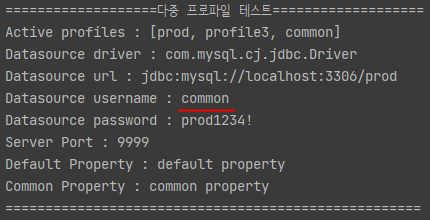
따라서 여러 프로파일에 공통적으로 들어가는 설정 내용이라면 되도록 설정 파일의 위에 작성하는 것이 좋을 것이다.
설정 내용이 많아지면 파일을 분리하여 관리하기
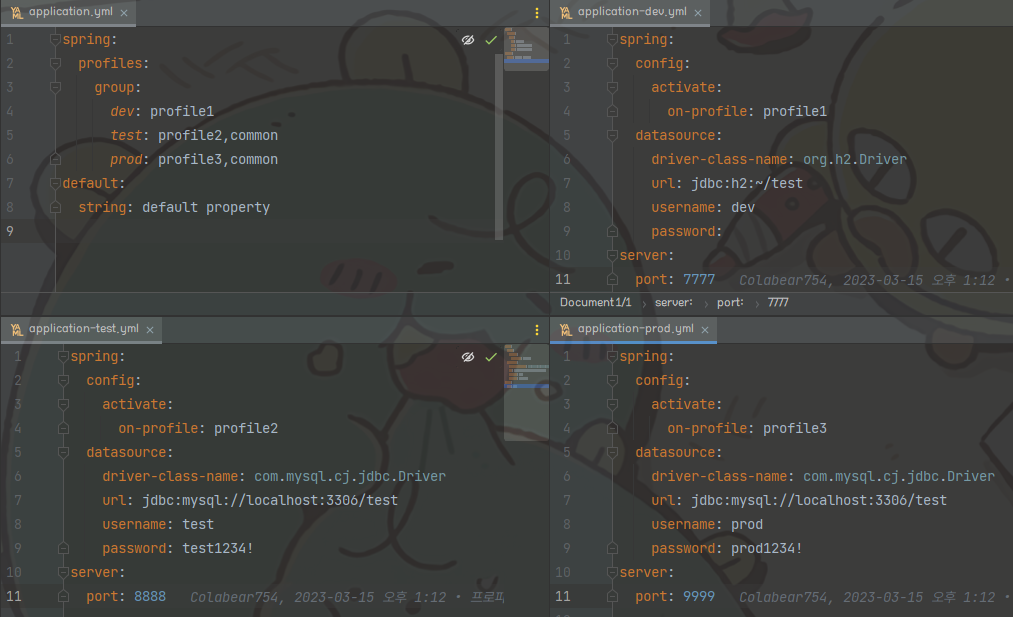
위의 예제에서는 단순히 DB 접속 정보와 서버 포트 번호만 프로파일별로 설정했으나, 실무에서는 프로파일별로 관리해야할 속성이 훨씬 많아질 수 있다. 이 경우에는 하나의 파일에서 모든 프로파일의 설정을 관리하는 것보다는 아래와 같은 방식으로 각 프로파일별로 파일을 분리하면 프로파일별로 설정을 관리하기 수월할 것이다.

참조 링크
application.properties VS application.yml 그리고 YAML을 사용하면서 겪은 문제점
application.properties 설정 Spring Boot는key-value 형식을 사용하는application.properties파일설정 값들을 가져와 쓸 수 있다. spring.datasource.url=jdbc:h2:dev spring.datasource.username=SA spring.datasource.password=password 각 라
newwisdom.tistory.com
'Development > Spring & Spring Boot' 카테고리의 다른 글
| [Kotlin + Spring Boot] 코틀린 + 스프링부트에서 Slf4j를 사용하여 로그 찍기 (7) | 2023.04.06 |
|---|---|
| [Spring] 유틸성 메소드를 작성할 때 Spring Bean과 정적 메소드를 모아놓은 클래스 중 무엇을 사용해야 할까? (0) | 2023.03.15 |
| [Spring/Spring Boot] Service와 ServiceImpl 구조에 대하여 (2) | 2023.01.26 |
| [Spring Boot] 스프링부트 3.0.0 이상 버전을 사용하려고 할 때 빌드 과정부터 에러가 나는 경우(Kotlin/Java 동일) (0) | 2023.01.17 |
| [Spring Boot] Springdoc 라이브러리를 통한 Swagger 적용 (6) | 2023.01.15 |


댓글